Italian traditional food organic, rustic, home cooking recipes
 

Tortelli
from Italian Traditional Food

Tortelli

Tortelli are a delicious meal in themselves

Tortelli are the larger version of the ravioli. Both contain the traditional filling of ricotta cheese and spinach. Tortelli are favoured amongst the rural housewives as they are more filling and to my mind, better tasting. Nowadys, the tortelli filling can be practically anything but I still prefer the traditional ricotta cheese and spinach.

Tortelli can be served with either pasta sauce and a sprinkling of Parmesan cheese or quite plainly with butter, a drizzle of olive oil and a sprinkle of Parmesan cheese. If you want to use pasta sauce on the tortelli, I would suggest making it the day before as it will save you a lot of preparation time.

The quantities below will make up to 96 tortelli. To make this quantity of just the tortelli will take you about 3 hours.

Serves: 8

Ingredients for filling:

4 oz breadcrumbs
4 oz Pecorino cheese (grated)
4 oz Parmesan cheese (grated)
8 oz ricotta cheese (2pcts from your supermarket)
1 large tin of spinach (press out as much liquid as possible)
4 whole eggs
2 egg yolks only (use the egg white to seal the tortelli)
salt & pepper (to taste)

Method:

1. Mix all the ingredients together until it forms a firm consistency.

Ingredients for tortelli filling

2. The tortelli filling should be moist to the touch without being wet.

Tortelli filling

Ingredients for pastry:

1 1/2 lb plain flour
6 whole eggs
pinch of salt
water (as required)

Extras:

2 egg whites (beaten, to be used to seal the tortelli)
Pasta making machine
Pastry board

Pasta machine and board

Method:

1. Mix all the ingredients together.

Mixing all the dough ingredients

2. Add cold water as necessary. to make a firm dough.

Adding cold water to dough ingredients

3. Continue to mix the ingredients until the dough is of a firm consistency.

Mixed dough

4. Turn out the dough onto a lightly dusted board.

Dough on floured board

5. Knead the dough until it is well mixed and firm without being sticky. Add a little flour as necessary.

Kneading tortelli dough mixture

6. Return the dough to the mixing bowl.

Dough for tortelli

7. Put the dough in the fridge to rest for 20 minutes.

8. Dust pastry board with a little flour.

9. Cut one piece of pastry off from the main dough so that it will be easier and more manageable to work with.

Cutting dough into smaller pieces

10. Work with one piece of pastry at a time. Return the rest to the fridge to keep cool.

11. Take one small piece and knead until firm (lightly dust with flour, as required)

12. Put the now firm pastry through the pasta making machine, starting at No.1 and finishing at No.6.

Pasta machine

The numbers represent the thickness of the finished pastry. I prefer to finish at No.5 as it results in chunkier tortelli whereas my family prefer theirs set at No.6 as the pastry is thinner. Just experiment to see which size you and your family prefers.

Putting dough through pasta machine Dough through pasta machine Dough going through pasta machine Pastry going through pasta machine

13. Lay out the pastry on a lightly floured board.

Laying out the tortelli pastry

14. Make a small ball of filling using a spoon. Make it about the size of a large marble.

Making tortelli filling balls

15. Spoon a little of the filling onto the pastry so that you end up with a row of seven or eight small egg sized mounds.

Adding tortelli mounds to pastry

16. This is how they should look.

Tortelli mounds on pastry

17. Beat the egg white and use it to wet between the filling mounds on the pastry using a pastry brush.

Brushing the egg white in between the tortelli mounds

18. Fold the pastry over the mounds.

Folding pastry over the tortelli mounds

19. The tortelli mounds should now look like this.

Tortelli mounds in a row

20. Press down (seal) in between the mounds to seal the pastry.

Pressing tortelli pastry down to seal

21. Cut around each of the mounds using a pastry wheel.

Cutting the tortelli mounds using a pastry wheel cutter

22. The cut tortelli should now look like this.

Cut tortelli

23. Trim the three edges of the tortelli using the pastry wheel cutter to make a nice ridged pattern.

Trimming tortelli edges

24. Inspect every one of the tortelli ensuring that they are all completely sealed (using your thumb and index finger press down on all sides of the pastry) otherwise they will open during the boiling process and allow water in and ruin the tortelli.

25. Lay the finished tortelli onto a towel covered tray to dry.

Laying tortelli on a tray

26. Repeat the above Steps 9-25 until you have finished using up all the pastry and filling.

27. This is how the tray of finished tortelli should look like.

Tortelli on tray to dry out

Cooking:

1. Add 1 level tablespoon of salt to a large pan of water.

2. Bring pan of water to the boil.

3. Add tortelli (as many as is required) and cook on a medium boil for about 10-15 minutes until tender.
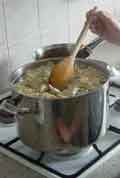
Tortelli in pan

4. Drain the tortelli.

Draining the tortelli

5. Spoon the tortelli onto serving plate.

Spooning tortelli onto plate

6. Add tomato sauce to tortelli.

Sauce on tortelli

7. Sprinkle with grated Parmesan cheese.

Sprinkle grated Parmesan cheese over tortelli

8. Serve immediately.

Finished tortelli on plate

Tip:

1. If the tortelli are to be cooked on the same day or within one-two days, store them in the fridge (turning them over at least once) otherwise, store in freezer bags in the freezer until required.

2. Tortelli can be kept in the freezer for up to two months. They can be cooked straight from the freezer but will need 15-20 minutes.

Locate another Italian Traditional Food recipe here

To discover more about Italian food visit the Italian Traditional Food webpage

Home
Recipes
Articles
Articles 2
Articles 3
Articles 4
Articles 5
Articles 6
Articles 7
Glossary
Glossary A - E
Glossary F- N
Glossary O- Z
Cookbooks
Cooking Tips
Italian Pantry
Making Jam
FAQ
Site Map
Site Search
Chianti the classic Italian wine
Bookmark page
Digg Stumbleupon Google Bookmarks Delicious Twitter Facebook Yahoo My Web Reddit
Latest Articles
Cooking Italian ....
Eating Italian ...
Italian desserts ...
The many uses ...
The benefits of ...
Cooking with ...
Making your ...
COMMENTS

'I just wanted to THANK YOU SO VERY MUCH for your wonderful web site! I have looked on dozens and dozens of Italian food web sites, and yours by far is the best. Thank you SO MUCH. It brings back so many memories ... '

'Great recipes and a great site...'

'At long last, a recipe site that delivers good basic food...'

'Tasty and easy to make recipes. What more can you ask for?...'

'Please keep on providing these rustic recipes as I enjoyed them very much....'

'Not only some great recipes but also some great articles. Thanks."

'What a good idea to provide these recipes. Keep up the good work.'

'Lots of very intresting articles on all aspects of the Italian lifestyle...'

'Wishing you every success with your great new recipe site.."

'Good to see some authentic Italian rustic recipes..."

'The step-by-step recipes are very easy to follow. Thank you.'

'It is so much easier to follow the Italian food recipes thanks to the step by step photos."

'...thank you for publishing this selection of rural dishes. They are fast becoming part of my staple diet.'